Disclaimer: This article is for general information and operational reference only and does not constitute any investment, security, or legal advice. The Bitfinex API interface and feature specifications may be updated at any time; please refer to the latest announcements from the Bitfinex official support center. Holding, lending, and trading cryptocurrency involve market risk, platform risk, and technical risk, and users must assess and bear the relevant risks themselves.
When creating an API key on Bitfinex for the first time, many people freeze in front of that settings page full of options: Funding Read, Funding Write, Wallets Read, Orders Write, Withdrawals, History… a long list of options, with nobody explaining clearly which ones to tick and which ones must never be enabled.
Get the setup wrong, and at best the bot won’t run. At worst — if you accidentally enable the Withdrawals permission — then once the API key leaks, an attacker gains the ability to move the funds out of your account.
The good news is this: an automated lending bot actually needs only four API permissions, and everything else can be turned off. This article walks you step by step through how to safely create a Bitfinex API key so that the bot can operate normally while keeping your exposure to a minimum. The whole setup takes only about 5 minutes.
What is an API key, and why does a lending bot need it?
An API (Application Programming Interface) key is a set of authorization credentials that lets a third-party program “operate specific account functions on your behalf.” It consists of two parts:
- API Key (public key): like an account identifier — it can be shared with others
- API Key Secret (private key): like a password — only you know it, and it must never be leaked
Once the bot has the API key, it can automatically submit lending offers, adjust rates, and update lending durations on Bitfinex according to the rules you set — but only within the scope of the permissions you grant. This is exactly the core of secure API key design: the principle of least privilege, letting the bot do what it should do and nothing else.
Take the FuNi automated lending bot as an example. While running, it needs to do the following:
- Check your lending wallet balance (to know how much is available to lend)
- Check the status of current lending offers (to avoid duplicate offers)
- Submit or update lending offers based on decisions from the APEX III engine
- Query filled lending contracts to confirm earnings status
- Read your ledger records to calculate daily earnings and generate the Telegram report
The API permissions these five tasks correspond to are exactly the four core items explained in the next section.
A lending bot needs four API permissions
These four permissions are enough for the bot to fully carry out all lending operations. Any other functionality falls outside the bot’s scope of work.
1. Funding: Read (Funding Read)
This permission lets the bot “view” your lending-related data: the status of current offers, the contents of filled lending contracts, FRR (Flash Return Rate) market data, and the history of your lending funds.
Without this permission, the bot can’t see the current market conditions or your offers, which can cause duplicate offers or confused strategy execution.
2. Funding: Write (Funding Write)
This permission lets the bot “take action”: submit new lending offers, cancel old offers, and adjust lending terms according to market rates.
This is the most core permission for a lending bot. Without it, the bot can only view and cannot execute any lending action at all. Every offer the bot places or cancels relies on this permission.
3. Wallets: Read (Wallets Read)
This permission lets the bot check your lending wallet balance. The bot needs to know how much of your USD or USDT is available to lend so it can plan offer amounts and avoid exceeding your available funds.
Important note: “Read” ≠ “Transfer”. Wallets Read can only view the balance figures; it cannot move any funds out of your account.
4. History: Read (History Read)
This permission lets the bot read your ledger records — that is, the interest credit details after Bitfinex’s daily settlement. FuNi uses this data to calculate your “earnings for the day” and “cumulative earnings this month,” and sends a daily earnings report via Telegram each morning.
Without this permission, the Telegram daily earnings report will stop working, and the bot can’t obtain accurate earnings figures.
(Advanced · Optional) Wallets: Write (Wallets Write) — auto-sweep deposits into lending
The four permissions above are all you need to lend in full. If you’d also like the bot to “lend out your money automatically, no matter which wallet you deposit into,” you can additionally enable Wallets Write.
It lets FuNi move funds between your own wallets — for example, automatically transferring idle USD/USDT sitting in your exchange wallet into your funding wallet to be lent, saving you a manual transfer every time.
To be clear: this is “moving money within your own account,” not “withdrawing.” Because the Withdrawals permission stays off, your funds can never leave your Bitfinex account — even if the key leaks, an attacker could at most shuffle money between your own wallets, and cannot withdraw a single cent.
If you don’t want this convenience and prefer to keep permissions minimal, just enable “Read” and move the funds into your funding wallet yourself.
⛔ Permissions you must never enable
The following permissions are completely unnecessary for a lending bot. Enabling them only adds risk: if the API key is ever stolen, the scope of damage expands dramatically:
| Dangerous permission | Why it must stay off |
|---|---|
| Withdrawals | Enabling it effectively allows the bot to withdraw your coins |
| Account Withdraw | Same as above, a withdrawal authorization on a different dimension |
| Spot trading (Orders Write) | Lending ≠ buy/sell trading — completely different operations |
| Margin trading (Margin Orders Write) | Same as above; a lending bot does not do leveraged trading |
| Deposits | A lending bot does not need it |
The principle is simple: only tick the four that lending needs, and keep everything else off.
Step-by-step setup guide
Step 1: Open the API management page
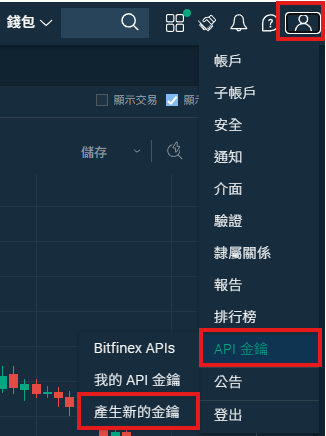
After logging in to Bitfinex, click your account avatar or username in the top-right corner, find “API” in the dropdown menu, or go directly to bitfinex.com/api to reach the API key management page.
If you don’t have a Bitfinex account yet, or haven’t completed KYC, please refer first to: Bitfinex Account Registration Guide 2026 (with a complete KYC pitfall-avoidance section)
Step 2: Create a new key
On the API management page, find the “Create New Key” or “Generate New Key” button and click to enter the setup screen.
The system may ask you to enter a 2FA (two-factor authentication) code or your login password. This is Bitfinex’s standard security procedure — just enter it as normal.
Step 3: Name the key
Give this key a clear, recognizable name, such as “FuNi Lending Bot” or “Lending Bot 2026”.
The benefit of clear naming: if you create multiple keys later (for example, one for the lending bot and one for a ledger tool), you can tell each key’s purpose at a glance, making them easier to manage and revoke.
Step 4: Tick only the four required permissions
This is the most critical step of the entire setup. In the permission list, tick only the following four items, and leave everything else unticked (off):
| Required item | Corresponding Bitfinex option | Description |
|---|---|---|
| ✅ Funding: Read | Funding / Read | Query offers and market data |
| ✅ Funding: Write | Funding / Write (Offer, cancel, close) | Submit and manage lending offers |
| ✅ Wallets: Read | Wallets / Read | Query lending fund balance |
| ✅ History: Read | History / Read | Read ledger records, calculate daily earnings |
After that, scan down through the rest of the list to confirm you haven’t accidentally ticked any withdrawal- or trading-related options.
(Advanced · Optional) If you want deposits auto-swept into lending, additionally tick “Wallets: Write (Wallets Write)” — see the earlier section “auto-sweep deposits into lending.” It only lets the bot move money between your own wallets; withdrawals stay off. Skip it if you don’t need it.
Step 5: Set IP access restrictions (required step)
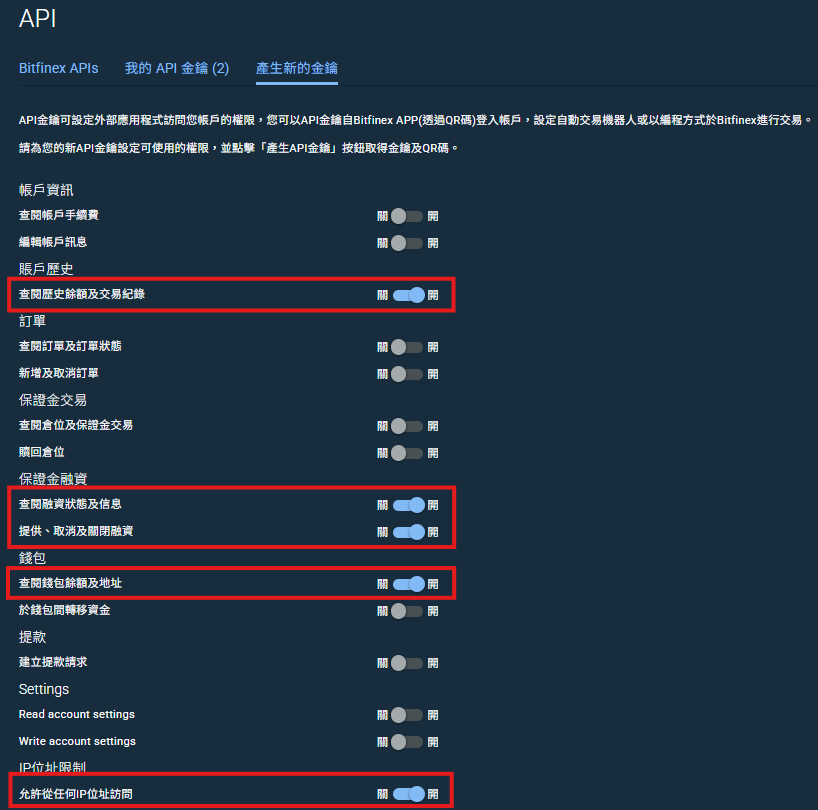
At the bottom of the Bitfinex API key creation page there is an “IP Access Restrictions” section, and you must make a choice here, otherwise the key cannot be created:
Allow access from any IP address (suitable for home dynamic IPs / people unsure whether their IP is static)
Tick “Allow access from any IP address” and the API key can be used from any IP in the world. This is the most convenient option, but the security level is lower. It must be paired with the minimum Funding/Wallets/History permissions plus never enabling Trading/Withdraw in order to keep the risk to a minimum.
⚠️ Common pitfall: if you don’t tick this option, Bitfinex won’t let you create the key. The next section explains in detail when an IP whitelist is a good idea and when it is not recommended.
Step 6: Save the key — it is shown only once!
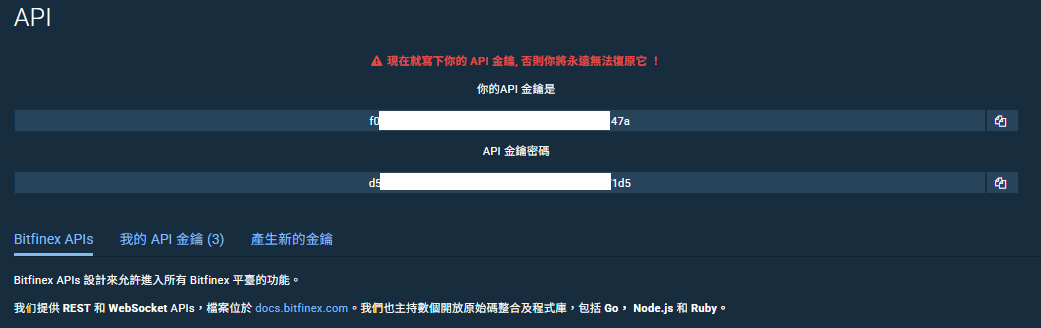
After confirming the settings are correct and completing 2FA verification, Bitfinex will display the full API Key and API Key Secret only once.
⚠️ This is the most important step — be sure to do it right!
Immediately take these two strings and:
- Copy and paste them into a password manager (such as 1Password, Bitwarden, or KeePass)
- Or store them in an encrypted note
- Do not store them in a plain text file, screenshot, Line chat, or email
If you accidentally fail to save them or forget and close the window, the API Key Secret can’t be recovered — the only solution is to revoke this key and create a brand-new one.
Step 7: Enter them in the lending bot settings page
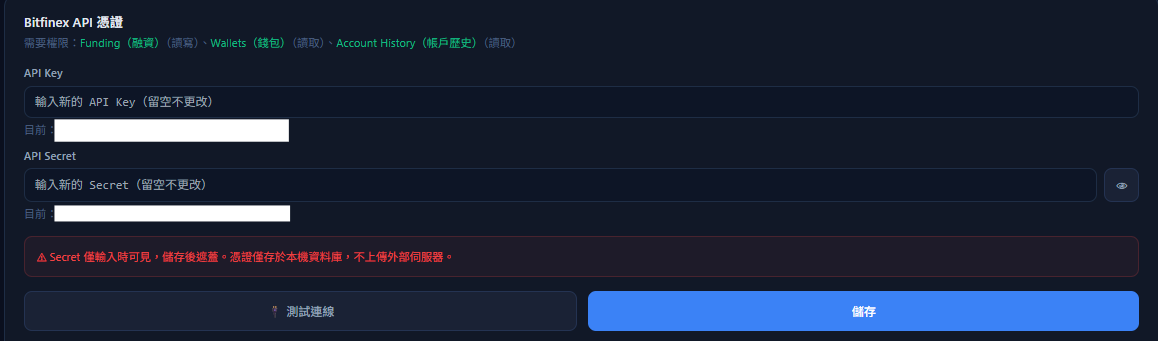
Once you have the API key, log in to the FuNi dashboard, go to the settings page, enter the API Key and API Key Secret into their respective fields, and save to confirm.
After the bot confirms the key is valid, it will start scanning the market and placing offers automatically according to the plan you chose.
If this is your first time using FuNi, you can first get familiar with the overall workflow: FuNi Bot Quick-Start Guide for Beginners
IP whitelist explained: when is it a good idea?
The IP whitelist is an extra security layer offered by Bitfinex that lets you specify “only requests coming from these IP addresses may use this API key.” Even if the key itself leaks, as long as the attacker’s network IP is not on your whitelist, they cannot use it at all.
Situations where enabling an IP whitelist makes sense
Running the lending bot on a VPS is the most typical use case. A VPS usually has a fixed static IP; entering that IP into the whitelist immediately raises your security protection by a level. Most lending bot services also recommend this kind of setup.
Situations where it is not recommended
- Home broadband (dynamic IP): each time you reconnect, your ISP may assign a different IP, making it easy to lock yourself out
- Using the same key from multiple locations: the office, home, and mobile hotspot all have different IPs, making the whitelist hard to maintain
- Unsure whether your IP is static: if you’re unsure, don’t set it — getting it wrong only causes trouble
How it works for FuNi users
FuNi uses a “each user binds their own Bitfinex API key” design. Your key is used only by your bot, is not shared with other users, and its rate limits are independent.
If you use the VIP plan, the bot runs in a fixed server environment. You can ask FuNi support for the bot’s outbound IP and then enter that IP into your Bitfinex API IP whitelist to further lock down the access source.
Common troubleshooting
If you run into bot errors or it isn’t working normally, most issues can be resolved using the table below:
| Symptom | Possible cause | Solution |
|---|---|---|
| Shows “Permission denied” or “no permission” | Funding Write not enabled | Return to the Bitfinex API settings page and tick Funding Write |
| Bot can’t read the wallet balance | Wallets Read not enabled | Tick Wallets Read |
| API key is completely invalid | The IP whitelist is blocking the bot | Confirm the bot’s outbound IP is on the whitelist, or remove the IP whitelist |
| Key is correct but the bot does nothing | API Key and API Key Secret were entered in reverse | The Key is the shorter string, the Secret is the longer one — recheck and re-enter |
| Bot suddenly stops working | The API key was revoked or expired | Log in to Bitfinex to check the key’s status, and recreate it if necessary |
Frequently asked questions (FAQ)
Q1: Without the withdrawal permission, can the bot move my USD/USDT out?
No. Withdrawals are a completely separate API permission, and the setup in this guide keeps withdrawals off. When only the lending-required permissions are granted, the bot can only perform lending and earnings queries within the Bitfinex platform and cannot move funds out of your account.
If you additionally enable “Wallets Write” to turn on “auto-sweep deposits into lending,” the bot can move funds between your own wallets (e.g., exchange wallet → funding wallet), but the Withdrawals permission stays off, so your funds can never leave your Bitfinex account.
This is exactly the core meaning of the “principle of least privilege”: every action the bot takes is hard-limited by the permission boundary and cannot break through that boundary because of how the software itself is designed.
Q2: Can one Bitfinex account create multiple API keys?
Yes. Bitfinex supports creating multiple API keys under the same account, each with its own name and permission scope. Common uses include:
- One dedicated to the lending bot (Funding permissions only)
- One for a tax or ledger tool (History Read only)
- The two operate independently without interfering with each other
We recommend giving each key a clear name for easier management and identification later.
Q3: My API key leaked — what should I do?
Revoke this key immediately!
Log in to Bitfinex, go to the API management page, find the corresponding key, and click “Revoke” or “Delete” — the key becomes invalid immediately. From the moment it is revoked, anyone holding that key can no longer use it.
After revoking, create a brand-new API key (set it up again following the steps in this article) and enter it into the lending bot to restore operation.
If you suspect that more than just the key leaked — that your account password may also have been exposed — you should also change your Bitfinex login password and reset 2FA.
Q4: Do I need to complete Bitfinex KYC to use an API key for lending?
Yes. According to Bitfinex’s official rules, accounts created after March 1, 2022 need to complete at least Intermediate identity verification to use the funding (lending) feature.
This requirement is unrelated to whether you use an API key or a lending bot — even if you plan to lend entirely manually, you still need the same level of KYC.
If you completed KYC verification when applying for your account, this step is usually already handled; you can confirm your verification status on the Bitfinex account settings page.
Q5: After I enter the API key in the FuNi settings page, how does FuNi handle it?
The API key stored in the FuNi dashboard is used only to perform the lending actions you authorized — checking balances, submitting lending offers, and canceling expired offers. You can modify or clear the API key settings in the FuNi dashboard at any time.
⚠️ If you revoke the API key on the Bitfinex side, FuNi’s lending actions will stop because of authentication failure. In that case you’ll need to create a new key on Bitfinex and enter it into the FuNi settings page to resume operation.
Q6: Does FuNi’s API setup need to distinguish between USD and USDT?
No. You only need to create one API key, and FuNi can manage both your USD and USDT lending at the same time. Offers in both currencies are executed through the same Funding permission, with no separate setup required.
Summary: complete a safe API setup in three steps
Create the API key, enabling only four permissions
- ✅ Funding: Read (Funding Read)
- ✅ Funding: Write (Funding Write)
- ✅ Wallets: Read (Wallets Read)
- ✅ History: Read (History Read)
- ➕ (Advanced · Optional) Wallets: Write — enable only if you want deposits auto-swept into lending; moves money between your own wallets only, cannot withdraw
- ⛔ Withdrawals and trading: never enable
VPS users should enter an IP whitelist — a static IP environment works best
Store the API Key Secret securely — it’s shown only once, so save it before closing the page
A correct API key setup is the first line of defense for using any automated lending tool. Spend five minutes getting it right, and the months or even years of bot operation that follow will feel much more secure.
If you aren’t yet familiar with the basics of Bitfinex lending, you can first read: Bitfinex Margin Funding for Beginners: Principles, Process, and Common Questions
Once your API key is ready, you can head to the FuNi plans page to choose a plan that fits you and let the APEX III engine start managing your Bitfinex lending automatically.
Disclaimer
This article is for general information and operational reference only and does not constitute any investment, security, or legal advice. The Bitfinex API interface, feature specifications, and KYC requirements may change as platform policies are adjusted; please refer to the latest announcements from the Bitfinex official support center (support.bitfinex.com) and API documentation (docs.bitfinex.com). Holding and lending cryptocurrency involve market risk, platform risk, and technical risk; past performance does not represent future results. Users must assess the risks themselves and consult a professional financial or security advisor when necessary.